Instructions for calibrating the RI8589 FetPulser TIM.
Requires:
Calibrated Digital Multimeter with at least 4 1/2 digit display (aka Volt Meter)
RIK0286A FetPulser Diag/Cal Block
FetPulser TIM
(Optional) FetPulser2 instrument, repeat the procedure with choosing "RI8589C FET Pulser Cals FetPulser2" Cal List.
To Calibrate the FetPulser Instrument:
- Unlatch and Fixture or Diag/Cal Interface plate if it is latched.
- Launch the Cassini application from the latest Dev selection on the Short Cuts menu. Always use latest Dev for calibration to assure accurate calibration data.
- If the TIM was recently swapped, WAIT 20 MINUTES MINIMUM for the FetPulser instrument to warm up after it is added to the configuration. Instruments will not warm up unless the Cassini software has initialized it at least once.
- Latch the Diag/Cal Interface plate to the Testhead and choose System > Check to add a Fixture to the configuration.
IMPORTANT: Never leave the Fixture, Diag/Cal plate or Block attached while the TIM is being started up during a System > Check or System > Equip > Startup. ( It IS SAFE to permanently mount the Diag/Cal Block to the Fixture.DO NOT attach the Diag/Cal block until immediately before running the Cal. Unlike the Diag plans, the Cal exec plans do not prompt to attach the block.) - Open the configuration window by choosing System > Tester.
- Choose the System instrument from the list. Right Mouse Button Click (RMBC) and choose Calibration > Calibrate to open a list of calibration executives. When calibrating FetPulser in T4, choose RI8589C FET Pulser Cals, for FetPulser2 in T9, choose RI8589C FET Pulser Cals FetPulser2 to open the Calibration executive. Make sure the model number revision "RI8589C" matches the TIM.
(Alternatively, use the default CalList associated with the Tester configuration by choosing Tester > Calibrate menu. Along with calibration for all other TIMs, this Cal list will include all the required calibration plans for both FetPulser and FetPulser2 instruments.) - Choose Options > Select Cal Kit. Choose any cal kit on the list to add CalKit to the configuration. There are no stored cal values that are used for calibrating this TIM, so any choice here will work. However, the Cal executive always checks for a cal kit definition before proceeding.
- Confirm that the 20 minute warm up period has elapsed.
- If the block is not permanently installed, attach the FetPulser Diag/Cal Block to the correct TIM (i.e. T4 for FetPulser, T9 for FetPulser2)
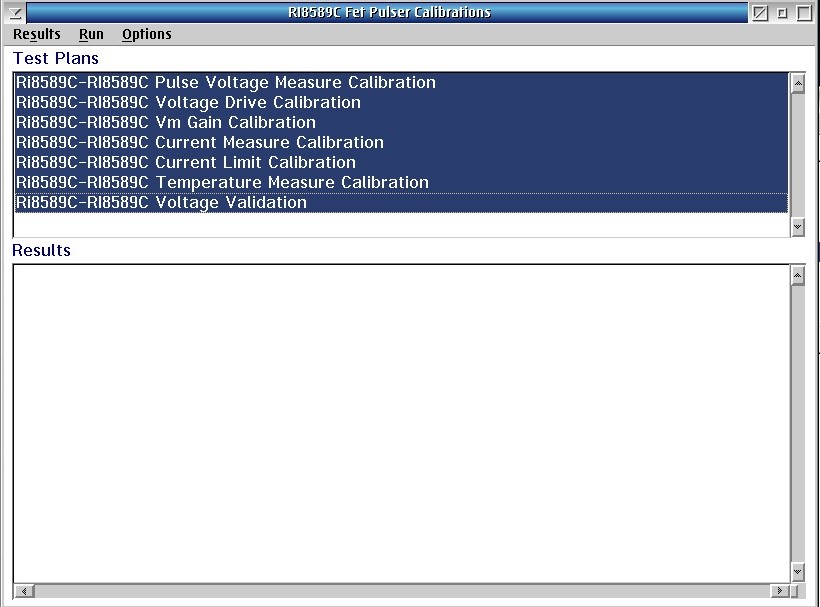
- Select all 6 Testplans from the list by clicking on them to highlight and then choose Run > Selected menu. (See Figure 1)
Note: The plans labeled 'cal' or 'calibration' perform the actual cals. They do not pass or fail. The plans labeled 'validate' or 'verify' confirm the calibration, and will pass for a successful calibration. - Follow the on screen prompts.
Note: If an operator error occurs, press CTL + Break keys after a prompt and choose Abort on the Control break Error prompt, then choose System > Reset from the main Cassini window to reload Cal data and return all instruments to their default (safe) idle state. Repeat all calibrations. - During cals, the calibration data resides only in RAM, and is automatically saved to Guru ONLY after the last selected testplan finishes with a Pass result.
IMPORTANTL: The RI8589C Voltage Validation testplan should always be selected if a subset of "... Calibration" plans are selected. - Remove the FetPulser Diag/Cal block (if it is not permanently attached).
- Close the RI8589C Fet Pulser Calibration window.
- If a FetPulser2 instrument exists in the configuration, repeat steps 6-14 with the appropriate Cal List.
- From the Configuration window, choose Tester > Diagnose to open the Diag Exec.
- Choose Run > All and follow the prompts. If "Passed" appears in the Results pane, release to production.
- Close any open windows and/or close the Cassini application.
Figure 1: RI8589C Fet Pulser Calibration Exec