The Auto Correlation System is used to compare the test results of sample units at the beginning of a lot or after Expiration (default 48 hours or <v44
ed before the Test Exec enables the Start button and a lot can be tested. Based on the current ACS process requirements, the operator must run 2 PASS and 2 FAIL CU DUTs before the Auto Correlation data can be saved and the lot allowed to proceed.
Required Software
Cassini Short Cut with the following Patches: 171, 202, 278, 325; (Short Cut released after 6/2021)
Auto Correlation System v34+; Guru Application, Db Manager v79+
Updates:
v38 "Number of Sites or ARMS" option to align with new Handler features.
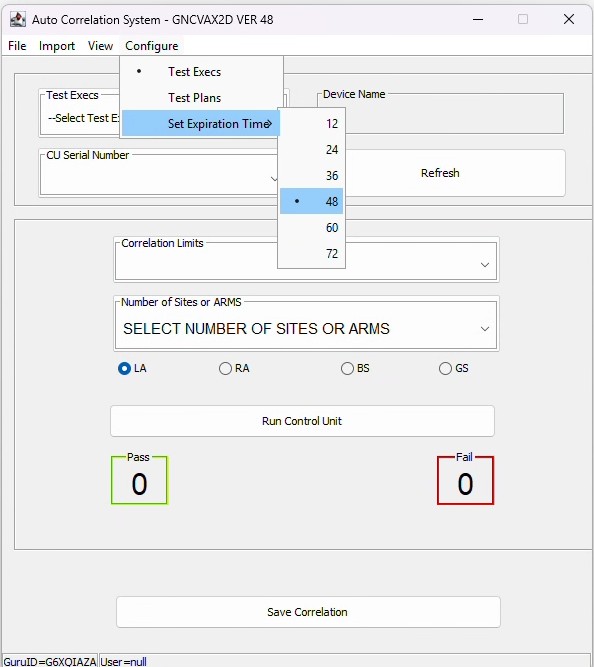
v45 "Configure > Set Expiration Time > [12 to 72] in hours.
Overview
Each step must be followed at least once before proceeding to the next step. This must be completed for each new Test Exec or whenever the number of Tests change. To archive the STDF datalogs generated while running AutoCorr validation process, a Guru Agent to Copy ACSdataSave to STDF Files. This administrative step is completed once(ever) and would be repeated for any new Guru server that is expected to export data. AutoCorr application can be launched anytime from the Apps button and is started automatically when a Test Exec with "Use Bias Offsets" is enabled.
- Collect Control Unit (CU) Data and Compute Limits.
- Enable Auto Correlation System (ACS) per Test Exec should be performed only once after the CU Test Data is collected.
- Prepare ACS By Importing CU Test Data and Limits any time the CU DUTs change or at some time interval as specified by statistical workflow requirements. The specific Control Unit (CU) device data where Upper/Lower CU Tolerance are defined as well as standard Upper/Lower limits for serialized set of DUTs in a .csv file which is paired with a specific Test Exec.
- Use a Test Exec with ACS Enabled.
User Interface
The Auto Correlation System Guru App supplements the standard Cassini Test Exec user interface. The same user interface is used for setup and "running" a Exec. (See Figure 10 for highlights.)
Choose View > View CU Data to inspect the the stored data of the ”Sample” parts and the limits and tolerance values for the DUT. (See Figure 11 and Figure 12)
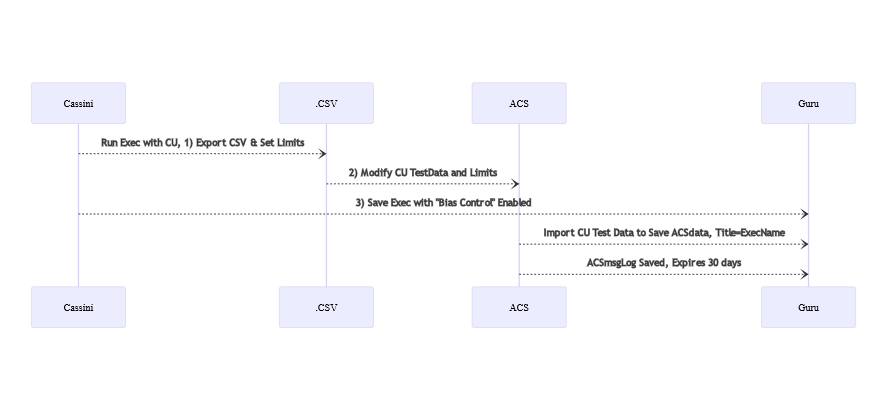
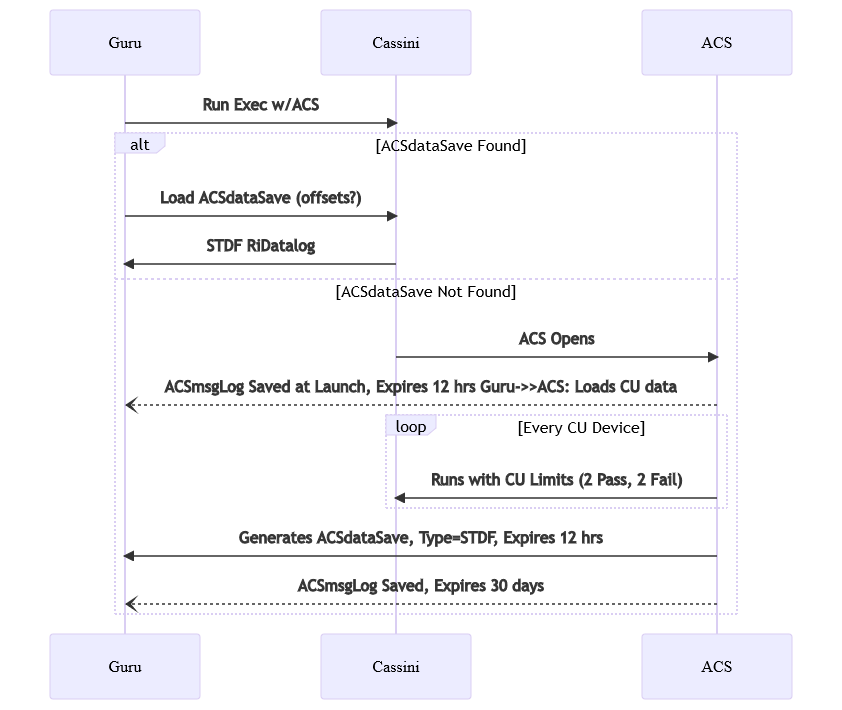
Sequence Diagrams
Dashed Arrows = Asynchronous, can happen in any order at any time, Solid Arrows = Automated Process
Collect CU Data and Compute Limits, Enable ACS & Import CU Data (Steps 1-3)
Use a Test Exec with ACS Enabled (Step 4)
Logging and Debugging Issues
Activity logs are saved in Guru as ri.sys.ObjClass=ACSmsgLog at startup (previous log) and whever a Save and "D:\RiApps\GuruApps\GNCVAX2D\ACS.txt" file. If there are issues, please include the Date/Time of the issue and version of the Auto Corr app and the log file with a steps to recreate the issue and a description of the problem to [email protected].
Manage Guru Objects
Control Unit (CU) Data is stored in Guru as "ri.sys.ObjClass=ACSdata" where ri.sys.Title = the Device Name. Contains the imported tables translated to Auto-Corr native CSV data that may not be in the same format as it was imported. This data never expires and is created in Step 3. This is valid per Test Exec and may not be valid for different Test Exec versions where Testplan changes may affect measurements or the total number of tests may change.
Correlation data is stored in Guru as "ri.sys.ObjClass=ACSdataSave" (See Figure 13). The ACS Data Save information is ss .ritdb, .csv file and a .stdf file on the tester at "D:/ACSdata/" for the sample parts tested during the correlation process (See Figure 14). The .CSV File file contains the Tested data, Sample Parts stored data, and the differences for each test. This is set to expire in 12 hrs with the "ri.sys.ExpireOn" Guru attribute that is a RiNum36 date/time value for when the object will be expired from Guru and is no longer visible to the system.
"ri.sys.ObjClass=ACSmsgLog" where ri.sys.Title = Tester Name. Contains AutoCorr application output. Saved to Guru on Startup (previous log) and whenever Save is pressed in AutoCorr. Retained for 30 days using the ri.sys.ExpireOn Guru Attribute. The ri.sys.ExpireOn attribute is a RiNum36 date/time value for when the object will be expired from Guru and is no longer visible to the system.
Example CSV Files
 ExampleBiasTestLimits.csv
 ExampleBiasControlData.csv
IMPORTANT: Rows of CSV must match the number of tests exactly. Avoid manually editing previous CSV files when the number of tests are changed.
1) Collect Control Unit (CU) Data and Compute Limits:
Follow these steps on the "golden parts" that are used to generate the reference data. The parts must be serialized. These steps can be repeated as new devices are required or every time a new test exec is created.
- If Cassini application is not already running, launch Cassini by choosing Short Cut and selecting the latest available.
- Choose Test > Run Package Execs... and select from the list.
Note: Worksheet details window must be enabled in the Views field to enable the data collection or this can be loaded from a saved .ritdb file. - Load serialized DUTs into the handler, fill in any required fields and choose Start to process the lot.
- After the lot is processed choose Stop to end the lot in the RI Test Executive window. Depending on ACS Pass/Fail criteria, inspect the worksheet to confirm that the required minimum number of Pass and Fail parts have been tested (minimum 2).
- From the Worksheet window, choose File > Save Csv. (See Figure 1)
- Select Transpose CSV in the Emit field and choose Select Output File to save it to a local drive, shared network drive or usb storage. Choose Save to write the file.
- Close the Test Executive.
- From a workstation, use a spreadsheet application to edit the .csv file and apply the desired calculations to get the required format for the CU Data and Limits used by the "Prepare ACS By Importing CU Test Data and Limits" steps below.
IMPORTANT: Rows/Tests must match the number of Tests in the exec precisely. Avoid manually editing previous CSV files when the number of tests are changed.
(See Example CSV Files "ExampleBiasControlData.csv".) - Follow the Enable Auto Correlation System (ACS) per Test Exec procedure below.
2) Enable Auto Correlation System (ACS) per Test Exec:
Perform these steps AFTER CU Data has been collected (above).
- If Cassini application is not already running, launch Cassini by choosing Short Cut and selecting the latest available.
- Choose Test > Edit Package Execs... and select from the list.
- Enable Use Bias Offsets in the Options section on the Exec tab. (See Figure 1)
- Choose Save (or OK) to close the Editor.
- Follow the Prepare ACS By Importing CU Test Data and Limits steps below.
3) Prepare ACS By Importing CU Test Data and Limits:
The Control Unit DUTs must be measured and the limits generated as a specially formatted .csv file.
- If Cassini application is not already running, launch Cassini by choosing Short Cut and selecting the latest available. (This step requires patches 171, 202, 278, 325).
- Choose Test > Run Package Exec and select from the list.
- Copy the edited .csv file(s) with the valid CU Data and Limits somewhere accessible to the tester' local SSD, (i.e. D:\Shared), shared network drive (Z:), or USB storage (E:) drive. (See Step 8 of "Collect Control Unit (CU) Data and Compute Limits" procedure above.)
- Choose Apps > Auto Correlation System.
- Choose Import > CU Test Data File and select the desired Test Exec Title and choose OK to proceed. (See Figure 3) This geneates an ObjClass=ASCdata object in Guru.
- Follow the Use a Test Exec with ACS Enabled steps below.
4) Use a Test Exec with ACS Enabled
Follow these steps when running production lots for an Exec where AutoCorr has been enabled and data prepared.
- If Cassini application is not already running, launch Cassini by choosing Short Cut and selecting the latest available. (This step requires patches 171, 202, 278, 325).
- Choose Test > Run Package Execs... and select from the list.
- If any of the criteria used to invalidate the data (12 hours elapsed since last saved or Fixture/DIB cal data changed), then the user will be prompted with a "Auto Correlation not current" notice, choose Ok to launch the Auto Correlation System guru app. (See Figure 3)
- Choose Yes to continue with ACS process or No to bypass the process and continue testing.
- Load a CU device, choose the CU Serial Number from the list and choose Run Control Unit button to start testing.
- The results will be displayed and the operator will be prompted with a RESULTS dialog asking "Is this a Sample PASS part?". If the CU Unit should PASS, choose Yes. If not, choose No. The operator then will get a similar RESULTS dialog asking "Is this a Sample FAIL part?" and the operator should choose Yes to continue or No to disregard the device. The answer determines which count to increment under the Run Control Unit button.
- The operator is then presented with either an "All Tolerances are within Spec" or "Correlations out of Tolerance" dialog depending on the device results. Choose Ok to proceed.
- Repeat steps 5-7 until at least 2 Pass and 2 Fail devices have completed. If "Correlations out of Tolerance" is shown, troubleshoot the issue and restart the process from the beginning. First, perform inspection of setup (check connectors), then validate DIB and Fixture data and follow the procedure for "Checking For Valid Calibration Data" (Cassini Reference Guide, CH7: Troubleshooting, Section 6: Checking for Valid Calibration Data). If Fixture cal data is not valid, calibrate Fixture, then calibrate DIB. If DIB cal data is not valid, then calibrate DIB. After calibration, start the process over at step 2.
- Choose Save Correlation, close the Auto Correlations System window.
- Proceed testing the lot by choosing Start from the Test Exec window.
- Choose Stop to end the lot and generate data. Close the Test Exec window.
- ACS Control Unit Datalogs are stored in D:\ACSdata\ directory and in guru as ri.sys.ObjClass = ACSdataSave and ri.sys.ObjFormat = STDF.
Follow the steps to "Create a Guru Agent to Copy ACSdataSave to STDF Files" to copy the STDF to the datalog analysis application.
ri.sys.Name = <TestExec Title>_"CORR"_<Arm for the handler being used>_<Tester Name>_<DIB SN or DIB Cal RID>_<timestamp>
Datalogs more than 30 days old are expired and deleted automatically.
Create a Guru Agent to Copy ACSdataSave to STDF Files
This should be implemented on the Guru Server (or servers) that handle exporting STDF Datalogs into a data repository for analysis.
- Similar to RiDataLog objects, a Guru Agent is used to copy the STDF data generated (ObjClass=ACSdataSave) to be imported into a data processing application.
- Choose Apps > Guru Agent Editor from the Guru Server remote desktop. The agent (ObjClass= RiAutoStart) can be created from any GuruID, but must be saved on the server before the server will recognize it and run automatically (ri.sys.Owner = GuruID).
- On the Sources panel, choose Match On: field to open the Source Selection Criteria dialog prompt and type "ri.sys.ObjClass=ACSdataSave,ri.sys.ObjFormat=STDF" and choose Ok.
- Choose Copied Files Tag (local.key=value): to open the Key to Set On Successful Copy and enter "local.ri.sys.STDF_Copied=true" and choose Ok.
- On the Destinations panel, type a path appropriate for where the .STDF files should be saved. (i.e. /home/guru/Testdata/STDF/) in the Location: field.
- Choose Destination Filename (template): to open the Rename Template prompt and enter "<ri.sys.Name>.stdf" and choose Ok. The ri.sys.Name value is set from the values active in the Exec when it is run with this file rename template; "<ri.sys.Device>_<ri.sys.ExecName>_<ri.sys.SystemName>_???_<ri.sys.Cid(OfExec)>_#DateNow".
- Choose Settings > Execution menu to open the Execution options dialog prompt. Select Regular Copy Agent (ACSdataSave objects are a complete STDF file, not pieces like the RiDatalog objects). Select Auto (regular intervals) for When to Run: field and leave the default 15 minutes value. Choose Ok when done.
- Choose Test > Run it and verify that the .stdf files appear in the target directory. (Requires unprocessed ACSdataSave objects)
- Choose Set 'next-run' time to enable this agent. Guru Server app will set this value automatically at startup, this menu option avoids having to restart Guru to enable this agent.
- Choose Guru > Save, the System ID should match the Guru ID of the Guru Sever and close the Guru Agent Editor application.
Figure 1: Save Csv from Worksheet
Figure 2: Use Bias Offsets Option Enabled
Figure 3: Auto Corr > Import menu
Figure 4: Auto Corr > What is your Test Exec?
Figure 5: Auto Correlation not current prompt

Figure 6: Results from Running a part
The operator is asked once the results are returned if the Sample part was the same as the results. They click on the “Yes” if was. The results are then compared against the stored data for the part and the differences are compared against the tolerance specs.
Figure 7: All Tolerances are within Spec
Figure 8: Correlations out of Tolerance
Figure 9: Save Correlation after receiving at least 2 Pass and 2 Fail.

Figure 10: Auto Correlation System Overview
Figure 10.1: Auto Correlation System Ver 34 (Handler Sites & Arm Support)
Figure 11: View menu
Figure 12: CU Data for Serial Number #
Figure 13: ACSdataSave objects in Guru Browser
Figure 14: Example Results in ADSdata directory

Figure 15: Auto Correlation System v45 Configure > Set Expiration Time > 48 (default)