

Access the Handler/Prober Pod configuration to modify its settings. Handler Pods can be identified by the model number (e.g. RI8516, RI8517, RI8552, RI8579) and physical interface (Parallel, Serial, GPIB). GPIB Probers require a RI8579B Prober Pod and are controlled with the same communication system but are programmed differently, so for the rest of this document, the "Handler" will only be used. The RI8505 Instrument Pods are programmed differently and may require special drivers from Roos Instruments, contact [email protected] with brand/model information. The "B" versions are physically taller and include opto-isolation circuits to avoid communication issues with Handlers which are operating on a different ground plane, typically by connecting to a different power source.
This document provides steps to configure a hander pod, and then example settings for each type (Parallel, GPIB, and Serial).
IMPORTANT: Only ONE (1) Handler Pod can be attached at a time. An additional GPIB Instrument Pod can be attached to control AUX instruments via a different GPIB cable/bus.
WARNING: The "Module Browser" can be used to reprogram ANY instrument attached. USE CAUTION and DO NOT perform any changes without explicit direction below. Due to risk of accidental instrument reprogramming, DO not regularly change the settings to support two different handlers, instead, purchase two Handler Pods and leave them attached to the handler when connecting different test systems.
Steps to Configure Handler Pod:
- Log in to Guru with a user with "Engineer" role.
- Start with a running Cassini system from the latest available Short Cut.
- Connect the pod using the supplied RIFL2 to RIFL3 cable to any available RIFL port on the side of the test head.
- Choose System > Check from the main Cassini window to identify the recently attached Handler Pod.
- Choose System > Equip > Nodes from the main Cassini window to open the Equipment Pool window.
- From the Equipment Pool window, choose Nodes > Control Modules menu to open the Module Browser window.
- In the Module Browser window, in the left navigation section, find and select the "XXXXX Handler". The the "XXXXX" is the interface type (Parallel/Serial/GPIB) or could be the name of the configured handler ( i.e. SEIKO EPSON ).
- In the top right section, click on the "Handler RI#####" with the left mouse button to highlight it. (RI#### is the model number of the Handler Pod).
- In the lower section, enter the appropriate values for the Pod in the yellow boxes. (Details below for each Pod type: Parallel, GPIB or Serial)
Caution: Do not change any of the default BIN assignment values. Bin assignments are handled by the Test Exec (program) and may be displayed in these settings for backward compatibility only.
IMPORTANT: Communication options should be set on the Prober and Tester to match. Depending on test time budget, these values may have an impact on the overall test time. - After all changes have been made in the Module Browser window choose Node > EE Save Node Info from the right mouse button menu. Choose Yes to confirm and DO NOT CHANGE THE HEADER VERSION when prompted, choose OK. Configuration is now complete. The configuration is stored in the Pod and does not rely on communication from the tester to load it's configuration. The EE-PROM has a limited number of writes (100,000)
- Now disconnect the Pod from the RIFL port and perform a System > Check to remove the Pod. Reconnect the Pod and perform a second System > Check and confirm the settings are read properly from the Pod.
PARALLEL Pod SETTINGS:
WAITFORSTART: This button provides the BIN number to be sent to the handler from the ROOS after a START TEST is received from the handler. Used as a debug tool.
SWITCH: Displays driver register data.
PULSEBINSITE2: Defines which bin is to be pulsed to the handler. Used as a debug tool.
PULSEBINSITE1: Defines which bin is to be pulsed to the handler. Used as a debug tool.
EOTWIDTHSECONDS: Defines the width in seconds of the End Of Test Pulse provided to the handler.
BIN POLARITY: Describes when the BIN signal is considered active. Choices are activeLow and activeHigh. See D-Sub Pins linked above for details about how these signal lines should be prepared. Pullup or Pulldown resistors may be required.
EOTPOLARITY: Describes when the EOT signal is considered active. Choices are activeLow and activeHigh.
STARTTYPE: Describes how the handler issues the Test Ready signal. The choices are level or pulse.
A level choice means that the handler will provide a signal level. A pulse choice will configure the tester to expect a pulse of Xms long as described in the handlers .ini file.
STARTPOLARITY: Describes when the START signal is considered active. Choices are activeLow and activeHigh.
HANDLER: Gives the name of the handler type.
MAXSITES: Multi-site handler support. 2 = dual site, 4 = quad, etc.
If you are doing dual-site PARALLEL testing on an Epson handler (as opposed to PING-PONG) then you must name the handler "Epson Parallel" (without the quotes)
MAXBINS: Defines the maximum number of bins supported by the handler.
MINWAITSECONDS: Defines the minimum time the tester will wait for a start pulse.
MAXWAITSECONDS: Defines the maximum time the tester will wait for a start pulse.
EOTDELAYSECONDS: Determines the delay time between the bin signal and when the EOT signal is sent.
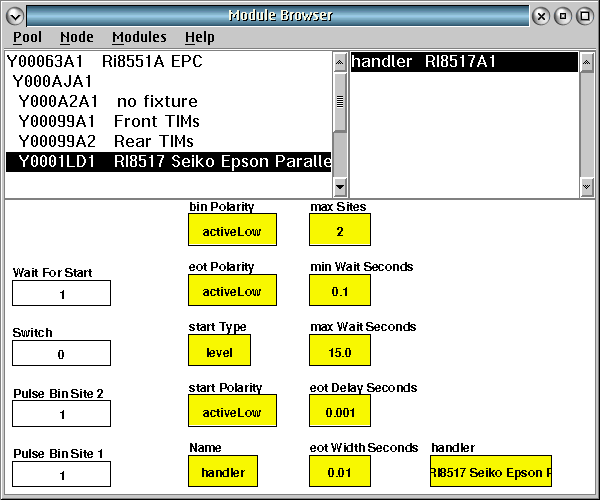
Example 1: Parallel Handler
GPIB Pod SETTINGS:
MINWAITSECONDS: Defines the minimum time the tester will wait for a "start" command.
MAXWAITSECONDS: Defines the maximum time the tester will wait for a "start" command.
ERRORSEPARATOR: Space (default), Colon (:)
GPIBTIMEOUT: Number of milliseconds before GPIB command times out (fails)
ADDRESS: GPIB Address of the handler. (Integer range 0 - 30)
HANDLER: Physical Interface Type (does not change)
READSIZE: 50 (Integer)
TYPE: None (generic GPIB commands), PA200, SUMMIT, Avantest, AvantestEcho, Rasco, SeikoEpsonEcho (possibly others depending on what patches are included in the running Short Cut)
MAXBINS: 31 (Integer), Maximum number of bins the handler can use
NAME: Common name that appears in the Module browser.
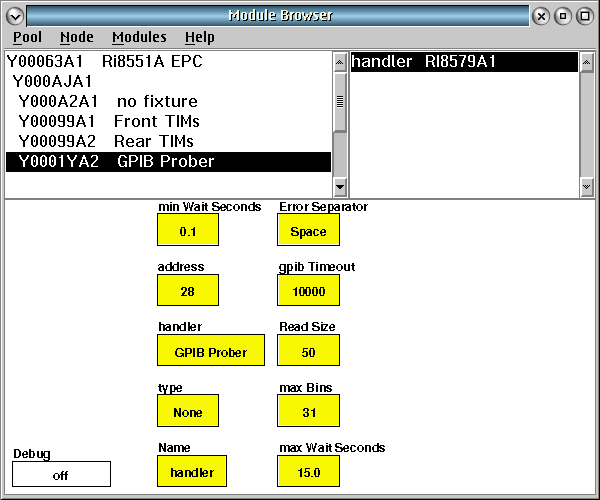
Example 2: GPIB Handler
SERIAL Pod SETTINGS:
HANDLER:
- MINWAITSECONDS: Defines the minimum time the tester will wait for a start pulse.
MAXWAITSECONDS: Defines the maximum time the tester will wait for a start pulse.
TERMINATOR: End of line convention. (none, CR, CRFL, LF) CR = Mac, CRLF = Win, LF = Unix
TYPE: EGProber, none, STLB320, SUMMIT (Sets the driver mode in Cassini, Custom or Handler Patch may be required)
NAME: Common name that appears in the Module browser.
HANDLERACK: String to send for handler acknowledge
STARTSTRING: String to initialize handler
DATAFORMAT: 8D1SN, 7D1SN, 7D2SN
BAUDRATE: 9600, 2400
HANDLER: Gives the name of the handler type.
MAXSITES: Multi-site handler support. 2 = dual site, 4 = quad, etc.
If you are doing dual-site PARALLEL testing on an Epson handler (as opposed to PING-PONG) then you must name the handler "Epson Parallel" (without the quotes)
MAXBINS: Defines the maximum number of bins supported by the handler.
EOTDELAYSECONDS: Determines the delay time between the bin signal and when the EOT signal is sent.
UART: (ROOS Support debugging only)
READSIZE: 1 (Integer), number of bytes to read
LOOPBACK: off (turn on to test UART)
DATATYPE: 8D1SN, 7D1SN, 7D2SN
BAUDRATE: 9600, 2400
WRITEDATA: String to send from UART (live). When Loopback is "on", change string data to be sent
STB1ADDRESS: 64 (assigned)
LOCATION: M1 (assigned)
NAME: uart (assigned)
READ: Click to read from UART (live), When loopback is "on", after entering new Write Data, press once to read the written data.
note: if UI is not responsive, System | Reset may be necessary.
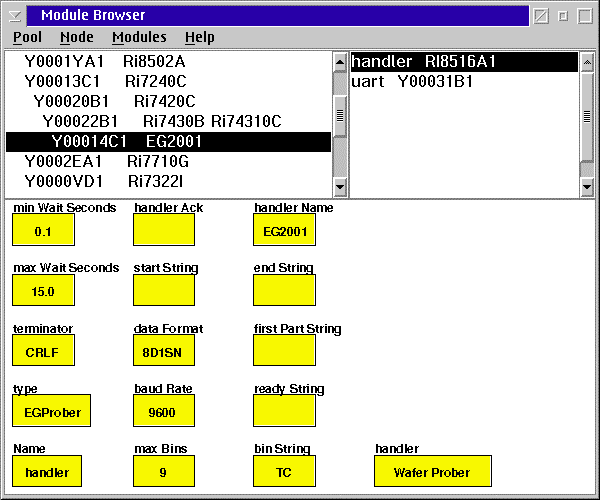
Example 3.1: Serial HANDLER
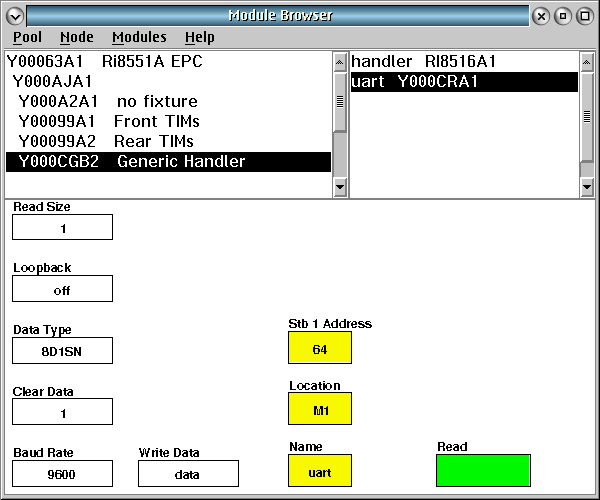
Example 3.1: Serial UART