

These instructions are used to prepare a fresh server for deployment as a Guru Server. These instructions are intended for Roos Instruments employees and service technicians. Guru Server is hosted on Ubuntu LTS with XFCE as the graphical user interface for administrators on any ubuntu supported hardware or VM or Cloud platform. Guru Server requires an X.org based GUI to interact with the non-OS features directly on the server.
Known working versions Xubuntu LTS: 22.04
Topics included below explain the procedure to prepare the default OS installation for Guru Server. Servers can be accessed using the local workstation (monitor and keyboard) or remotely via RDP/VNC (remote desktop UI) or SSH (command line). When possible both command line and GUI instructions are provided. Instructions not provided below can be found by searching online for "ubuntu <topic>" to access a vast amount of information.
Network Time Protocol (NTP) is required for accurate reference time in GMT for Guru to function correctly. When a guru client makes a connection to a guru server, and the GMT is different, the client will assume the Guru Server time for all timestamps.
Topics Covered: Deploy Xubuntu, Install OpenJDK Java and xrdp, Install Guru Server Server Administration, Remote Desktop, Network Settings, NTP Settings, Timezone, Mount Shared Network Drives (NFS), Shared Folders, Change OS Update Country, OS Update, Guru Server Launch Script, Identify Guru Server Version, Hardware Monitoring.
Install Xubuntu LTS:
- Prepare hardware of VM according to
 Guru Server - Recommended & Minimum System Requirements
 - Download Latest Xubuntu LTS release, 64-bit Minimal ( https://xubuntu.org/download/ ) or ubuntu Server minimum and then "sudo apt update & sudo apt install xubuntu-desktop"
- Install via USB or mount the .ISO in your VM (Search google for "iso to usb" or try https://rufus.ie/en/ )
- After booting the installer, double click on the Install Xubuntu Minimal icon on the desktop.
- Choose Language, Keyboard layout, Internet Connection, Interactive Installation, Xubuntu Minimal, No recommended proprietary software...
- For Disk Setup, recommend Advanced > Use LVM. (RI Recommends a separate mount point for /home where the program and data is stored, this is configured after installation.)
- Type "Guru" for Your Name and "guru-server" as Your Computers name, username defaults to "guru", enter a good password
- Un-check Require my password to log in, select your timezone.
- Review your choices and choose Install
- Wait for the installation to complete and the OS to reboot.
Note: If the installation hangs, reboot and start over without selecting "None" for Internet Connection. (see alt process with ubuntu Server minimum) - After initial setup, install any VM Guest OS packages.
Guru server requires the following additional packages: Java (OpenJDK 21 or later), tcsh for guru launch script, ntp for network time, 32bit libs, mosquitto (MQTT broker) and admin utilities. These are installed an install-server.sh script is included to assist with this process.
Install Guru Server
1. Copy the install package (tar.gz) and Guru ID (.zip) to the host user's home directory (note: company specific <<guru_id>>.vfd may be packaged in the .tar.gz)
scp gSrv##-l-<<Company>>.tar.gz <<guru_id>>.zip guru@<hostname>
2. Unpack program (and guru ID) in the /home/<user> directory:
tar -xvf gSrv##-l-<<Company>>.tar.gz
unzip <<guru-id>>.zip
3. Run the install script "sudo ./install-server.sh" to install dependancies
apt update
apt -y dist-upgrade
apt install -y mousepad gedit
apt install -y firefox
apt install -y xarchiver thunar-archive-plugin
apt install -y sshfs gvfs-backends smbclient
apt install -y openssh-server libssl-dev
apt install -y sqlite3 libsqlite3-dev sqlitebrowser
apt install -y openjdk-21-jre
apt install -y mosquitto mosquitto-clients
apt install -y xfce4-taskmanager xfce4-goodies gnome-system-monitor
apt install -y libxm4
apt install -y tcsh
apt install -y dkms
/* addd rdp support */
/* https://phoenixnap.com/kb/xrdp-ubuntu */
apt install -y xrdp
adduser cassini ssl-cert
# custom mosquitto MQTT broker options
cp mosquitto.service /usr/lib/systemd/system/
dpkg --add-architecture i386
apt update
apt install -y libc6-i386 libxm4:i386
4. Configure XRDP: https://learn.microsoft.com/en-us/azure/virtual-machines/linux/use-remote-desktop?tabs=azure-cli
NOTE: TeamViewer may also be installed to facilitate for remote RI support.
5. (Optional) Disable crash reporting.
sudo nano /etc/default/apport, set enabled=0
sudo apt purge apport
6. (Optional) Remove all non-essential Ubuntu packages (like open office) to save time performing updates and reduce disk storage footprint. (internet search
sudo apt remove libreoffice* parole rhythmbox
sudo apt autoremove
sudo snap remove thunderbird
7. Reboot the OS.
8. Prepare Guru ID. Add guru user to 'disk' group and create loopback floppy device for guru key. GuruServer defines it's identity from this loopback device when the server starts.
sudo usermod -a -G disk <<username>>
sudo mkdir /media/floppy
9. Mount GuruID loopback "floppy" drive manually:
sudo mount -t vfat -o loop /home/<<username>>/<<guru-id>>.vfd /media/floppy
And at startup.
sudo nano /etc/fstab
append the following line to the end of the file:
/home/guru/<<guru-id>>.vfd /media/floppy vfat user,loop 0 0
then press CTRL+X, Y, enter to save the file.
10. Disable Lock Screen by Power Manager > System and uncheck Lock screen when system is going to sleep
11. Create Autostart entry with Settings > Session and Startup > Application Autostart tab > +Add button, with "Guru Server" name, any helpful description, and command = /home/guru/riApps/guruServer/guruServerStart.sh -RiRootGuru
note: .sh script performs automatic updates (when manually imported into guru via .gzp or replace guruServer.zip) and will automatically restart Guru if System > Shutdown or process terminated.
12. Restart the server and confirm Guru UI appears. Confirm GuruID by choosing Login button, the Guru ID is displayed in the UserName prompt, use "roos inst" and "cathy" and continue setup.
13. Configure Guru Server settings by launching the Apps > Guru Address Book Admin > Check View Local Addresses > Select Title=<<guru_id>> > Edit Selected. Adjust the Remote Pipes to 32 or to match the number of clients expected + 2 (for overhead), then press Save. Restart Guru by selecting System > Shutdown. It will automatically restart after a few moments. Local/Remote Pipe configuration defaults to 32 or 2x number of Cassini Systems + Virtual Workstations, limited by system resources: RAM, CPU and Ethernet interface.
14. Guru should now be accessible from Cassini ATE and Virtual Workstation (via tcp port 50000) - Test by setting up a Cassini Tester or VM with an update/backup connections to the newly deployed server.
15. (Optional) Continue setting up the Guru domain (users/permissions)
See Connect to Guru Server with Guru Address Book https://roos.com/docs/RBEH-8WDMHY
See Initialize Guru Domain & Create Users https://roos.com/docs/RBEH-97PUXM
16.
Reference:
Server Administration
There are multiple interfaces used to administer Guru Server. 1) Monitor/Keyboard/Mouse. 2) Graphically via Remote Desktop (rdp). 3) Terminal session via SSH. Password is required for RDP access (vs SSH which can use a cert).
Default username/password = guru/****UNIQUE****
(note: SSH prevents "root" logon, use "guru" then prepend commands with "sudo")
Best security practice is to use both SSH cert to create a local tunnel for the RDP client as well as a sufficiently complex password.
Remote Desktop
Setup Instructions: xRDP – Allow multiple sessions (local and remote) for the same user – HowTo – Griffon's IT Library
The the ONLY way to interact directly with Guru Server app is via a remote terminal or KVM (Keyboard/Vdieo/Mouse). The command line interface (ssh) can only be used for OS activities. Command line interface can be opened via the local terminal and SSH for remote sessions.
Use a Remote Desktop client to connect to "<hostname>:3389" and enter the user credentials to access GUI.

Since many of the configuration changes do not have a graphical user interface. Use "sudo mousepad /path/to/file" from a terminal to open a graphical based text editor.
From a command line: "ssh guru@<hostname>" and follow "from Terminal" instructions (where available).
Network Settings (IP Address, DNS, host name, etc.)
"NetworkManager" is used to connect to LAN. LAN is managed by company IT. See also Xubuntu Documenation - Network Connections.
From Desktop:
- Click on the NetworkManager icon in the task bar. Click "Edit" to change settings, "Information" for IP address information. Follow the dialog prompts to make any changes.
From Terminal:
- "sudo nano /etc/NetworkManager/system-connections/LAN"
For Static IP: edit "[ipv4]" to include "method=manual" and "address1=10.0.0.1/24,10.0.0.1" (address/net, default route)
Proxy Setting
Collect your network's proxy information. There may be differences between HTTP, HTTPs and FTP. replace "localaddrses" with the IP address of your machine, and ".localdomain.com" with your domain's global DNS.
From Terminal: "sudo nano /etc/environment", add the following lines. Note: You must duplicate upper case and lower case because some programs only look for one or the other.
- http_proxy=http://myproxy.server.com:8080/
https_proxy=http://myproxy.server.com:8080/
ftp_proxy=http://myproxy.server.com:8080/
no_proxy="localhost,127.0.0.1,localaddress,.localdomain.com"
HTTP_PROXY=http://myproxy.server.com:8080/
HTTPS_PROXY=http://myproxy.server.com:8080/
FTP_PROXY=http://myproxy.server.com:8080/
NO_PROXY="localhost,127.0.0.1,localaddress,.localdomain.com"
Some newer GTK3 programs rely on the Gnome settings instead. To make sure they are covered, open a terminal and paste the modified lines below, one at a time:
- gsettings set org.gnome.system.proxy mode 'manual'
gsettings set org.gnome.system.proxy.http host 'myproxy.server.com'
gsettings set org.gnome.system.proxy.http port 8080
- Acquire::http::proxy "http://myproxy.server.com:8080/";
Acquire::ftp::proxy "ftp://myproxy.server.com:8080/";
Acquire::https::proxy "https://myproxy.server.com:8080/";
NTP Setting
From Terminal: "sudo nano /etc/ntp.conf", update "server <hostname>" where <hostname> is the IP address or host name of the local NTP server..
See also Ubuntu Official Documentation - Time Synchronization with NTP.
Timezone
First click "Unlock", enter password, then click on the "Time zone:" field to select the appropriate time zone.
See also Ubuntu Community - UbuntuTime.
Mount Shared Network Drives (NFS or SMB)
IMPORTANT: /RiGuru and /RiApps should NOT be hosted on a remote NSF server without proper tuning.
From Terminal: "sudo nano /etc/fstab"
- Then add a line with this general syntax to connect to NFS server.
example.hostname.com:/ubuntu /local/ubuntu nfs rsize=8192,wsize=8192,timeo=14,intr
Then add a line with this general syntax to connect to SABMA or Windows server.
//myserver_ip_address/myshare /media/samba_share cifs credentials=/etc/samba/user,noexec 0 0
Shared Folders (Samba)
From Terminal: "sudo nano /etc/samba/smb.conf" Modify [global] or [Public] with changes.
See also Ubuntu Official Documentation - Samba
If running on VBox host, install Guest Additions then run "sudo usermod -G vboxsf -a $USER" to enable access to sf_ drives
Change Software Update Country
NOTICE: Regular software updates are NOT recommended. You SHOULD apply urgent security updates regularly or when requested by Roos Support.
Software updates are configured for United States. To improve update performance, change "Download From" to your country name.

From the Updates tab, uncheck "Recommended" and "Unsupported" from the Updates tab to only include important security updates.
See also Xubuntu - Managing installed applications
OS Software Update
Notice: Security updates should be applied, unless instructed by Roos Support, regular updates do not need to be applied for reliable functionality.
With a internet connection to port 80 & 443 (https), software update dialog will appear based on the frequency it is set to check.
Update can be run anytime:
See also Xubuntu - Managing installed applications
Guru Server Launch Script
Guru Server requires a GUI (X) session to be running, so the "guru" user is set to autologin and Guru Server is set to start from the Xfce Application Autostart settings. DO NOT change these settings unless instructed by Roos Instruments. This information is provided for disaster recovery purposes only.
Guru Server is launched from the
Select "RI Guru Enterprise Server (Roos Instruments Guru Server)" and press Edit. Command = "/home/guru/RiApps/guruServer/guruServerStart.sh"
"guru" user is set to automatically log on via configured file "/etc/lightdm/lightdm.conf" under the "[SeatDefaults]" section.
Identify Guru Server Version
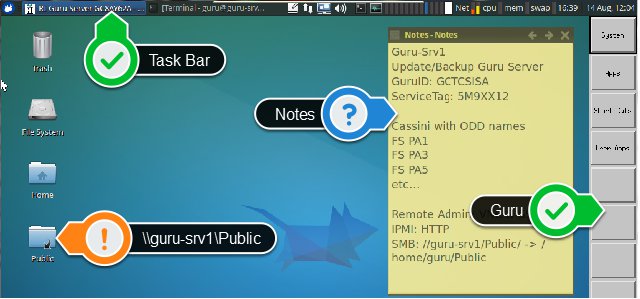
Identify the version of Guru Server that is currently running by hovering over the "[RI Guru Server..." task along the Task Bar.

Determine the OS version with "lsb_release -a" command.