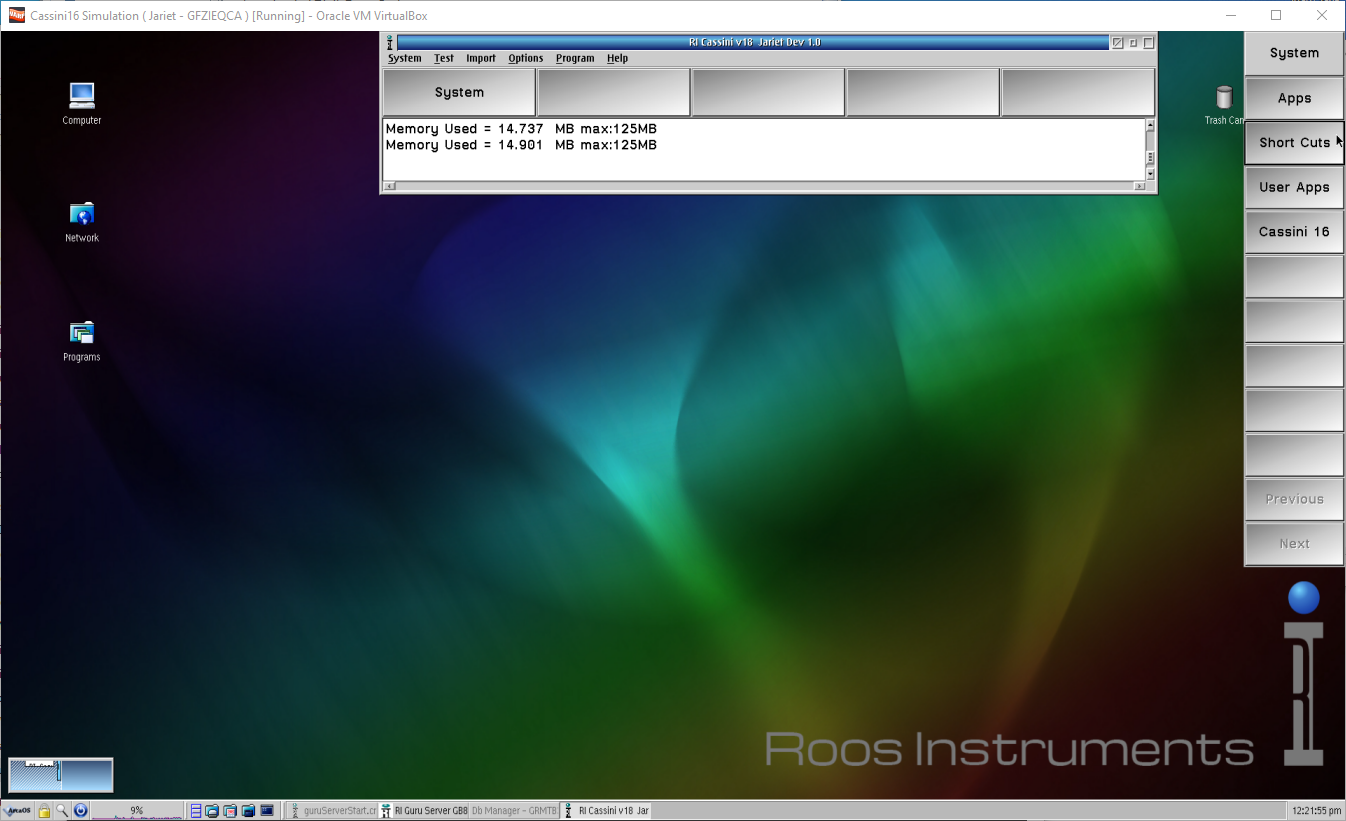
These detailed instructions are indented to help deploy Cassini's Virtual Workstation on a Virtualbox Host machine to use as a target for Remote Test Exec Control via System Message (SM). The Cassini Virtual Workstation appliance (.ova) is intended to run on on a server or workstation with VirtualBox client to host the VM and bridged network configuration for direct access to the guest OS. For more information about the Guest OS, see also ArcaOS, eComStation (eCS), and OS/2. The Cassini user interface requires the operator launch the latest Cassini application by first logging into Guru and then choosing the latest available version from the Short Cuts button. The Db Manager application which listens to TCP port 50050 for System Messages (SM) used to load and start the Test Exec. The VM can be configured with Bridged Mode network to work with a remote development device or Host Only network to connect with the remote control software on the same host (local "offline" development).
See also
Setup Cassini VM for Remote Control (SM):
- Download and install the latest version of VirtualBox from their download page.
- Download the custom "CassiniVM...ova" file linked in a separate message from Roos Instruments.
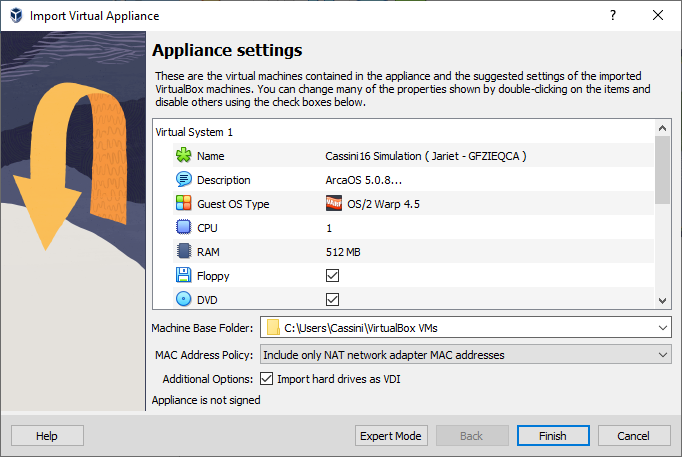
- Choose File > Import Appliance... (.ova) and follow the prompts.
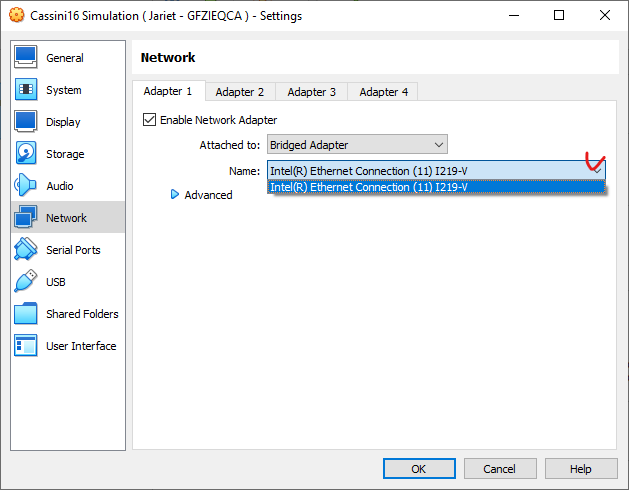
- Choose Machine > Settings > Network, changed Attached To to Bridged Adapter and select the active network connection's Name.
(Optional: use Host Only networking to work locally. Note: check host OS firewall if there are connection issues) - Launch the "CassiniVM ... v#.#" and configure with any OS customization like shared network drives and/or printers, default screen resolution, currently 1280x1024.
Shared Folders with VirtualBox (RI Virtual Workstation, VBox 6+) https://roos.com/docs/RBEH-8K52LD
Screen Resolution with Virtualbox (Cassini Virtual Workstation) https://roos.com/docs/RBEH-A9CPVP - Notice that Guru and DB Manager are launched automatically at startup.
- Setup ArcaOS IP Address Settings (Default = DHCP). System Setup > Network > TCP/IP > TCP/IP Configuration > Host Names (set as "RoosRemote_G?????CA", location_GuruID)
- Once booted, from the Files icon on the ArcaOS task bar, choose the Guru ID from Drives > Drive D > GuruKeys > [GuruID].zip to open the Archive Tool. This activates the selected Guru ID the next time Guru is restarted.
- Notify the individual managing the Guru ID Licenses for your corporation that this specific Guru ID has been assigned to you. The same Guru IDs should NEVER be used concurrently.
- Select the blue Extract files to icon (or File > Extract To menu) and enter "D:\" for the destination path, change File Paths to Extract full paths and press Extract button, then Yes to confirm replace existing file.
- Restart Guru with new ID by choosing the Logon button on Guru, enter "roos inst" :"cathy" and then choose System > Shutdown to close Guru and allow the Startup script to automatically launch Guru.
- Confirm the newly extracted GuruID matches the Guru Logon prompt; enter "roos inst" :"cathy".
- Add a new connection (follow steps A for new Guru IDs) or restore the connections from the server (B for already deployed Guru IDs), depending on if this Guru ID has been initialized before.
- To add Update/Backup Guru Server connections (First Time Install)
- Choose Apps > Guru Address Book Admin > New Remote Address.
Name = <Site>Guru, Address = <IP or hostname of guru server>, Address Type = Backup, then press Save. - Then select the newly added connection, choose Edit Selected, change Address Type = Update, then Save As.
- Confirm there are now two entries in the list. Close the Guru Address Book Admin app with File > Exit.
- Restart Guru again with System > Shutdown. Confirm that it restarts automatically with a green Logon button, indicating a valid Update connection to an Guru exists.
- Confirm that more Guru Connections were not updated from the server connection by choosing Apps > Guru Address Book Admin and confirming that only two entries exist. If multiple entries exist, use the Delete Selected with the duplicate selected until there is only one "backup" and one "update" connection.
- To restore Guru Server connections: (Upgrades)
- Close Ri Guru Startup program by right clicking on the task named "Ri Guru Startup" from the OS task bar or Window List (CTRL + Esc) and choosing Close "Ri Guru Startup" to shutdown Guru.
- Open a Command Prompt window, type "d: [enter]" then "cd riapps\guruserver [enter]"
- Type "startApp.cmd -RiBackupGuru <guru hostname> -RiUpdateGuru <guru hostname> [enter]" to start Guru, replacing "<guru hostname>" with the IP or host name of the guru server, no brackets).
- Choose Logon button on Guru and confirm the assigned Guru ID in the Logon prompt. Enter "Engineer" : "password" and continue. (note: "roos inst" :"cathy" may be disabled as soon as you connect to ADI's guru)
- Restore Guru settings by selecting System > Restore. This should copy the last version of every guru object "owned" by the Guru ID, including the pair of RiGuruAddress objects. There is no progress bar, but the CPU graph should return to 0 when it completes.
- Restart Guru (System > Shutdown) and launch Guru Autostart from Desktop > Computer > Startup > Ri GuruServer Startup. Confirm that it restarts automatically with a green Logon button, indicating a valid Update connection to an Guru exists.
- Restart Guru again with System > Shutdown. Confirm that it restarts automatically with a green Logon button, indicating a valid Update connection to an Guru exists. Shut down the OS.
- Identify the local IP address by opening a Command Window and typing "ifconfig lan0". Use this as your target IP address/hostname for Remote Control evaluation.
- Backup this configuration by exporting the newly initialized VM using the File > Export Appliance... menu option and name it "CassiniVM <Location> <GuruID>.ova" (ie. "CassiniVM ADIGT GE267ZCA.ova"). and use this newly created file to recover this initialized Guru VM in the future.
Prepare VM for Remote Control (SM):
- Start the "CassiniVM..." and, once booted.
- Choose Logon and type training for both username and password and choosing OK.
- Choose Short Cuts and select training - released to launch the Cassini application.
- Now ready to receive SM messages via a open network connection with TCP port 50060 the IP address.
Troubleshooting Tips:
- Confirm valid IP address with command window, ifconfig lan0.
- Choose Db Manager Guru button to see if Db Manager is running with "Text mode bridge enabled on port: 50060" with a white background, the background of Db Manager will turn yellow if the port is already connected with a previous instance of Db Manager.
.OVA Release Notes
v1 - includes "training" ShortCut and Auto-Trial 50% Yield Test Exec useful for remote control evaluation.
Machine Settings: 512 MB memory, 1 CPU, The C:\ and D:\ partitions share the same thin provisioned 16GB .vmdk Hard Disk (IDE), ~1 GB used. CD/DVD and Floppy available for mapping, e1000 network (NAT ok).
Alternate instructions
RI RemoteControlTest.pdf - document for the remote TestExec control
Test.java - example program to load, compile, test some parts, end lot and unload TestExec
SampleTestControllrt2.java - command line input example
The Cassini Simulation system required VirtualBox, it can be download from https://www.virtualbox.org/wiki/Downloads
The remote control example require Java.
After installed the VirtualBox and downloaded the files, you can double click on the Cassini16 Simulation ova file, VirtualBox appliance, and it will import the appliance into your VirtualBox.
Verify the setting and click on Finish when ready
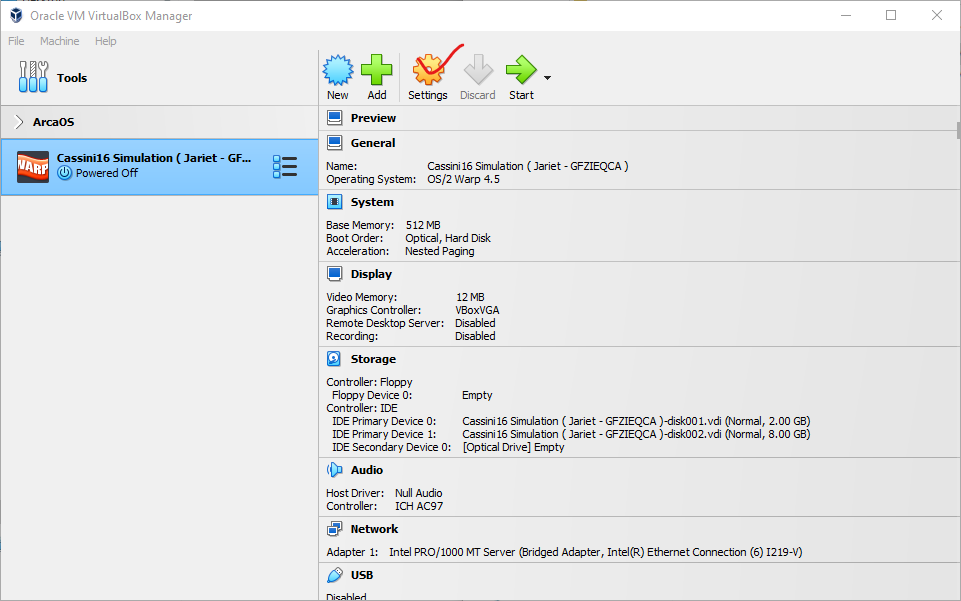
After the Appliance is imported you need to verify the setting of the network adapter and the local share folder. Click on Settings as shown
The VM is setup with the Bridged Adapter, click on the Network then click on the Name field and select your network adapter name.
Next, click on Shared Folders, edit the share, this is the folder that will use on transfer your file between VM and the host. we have set the mount point as L: drive on the VM and the C:\User\Public as the share folder on the host.
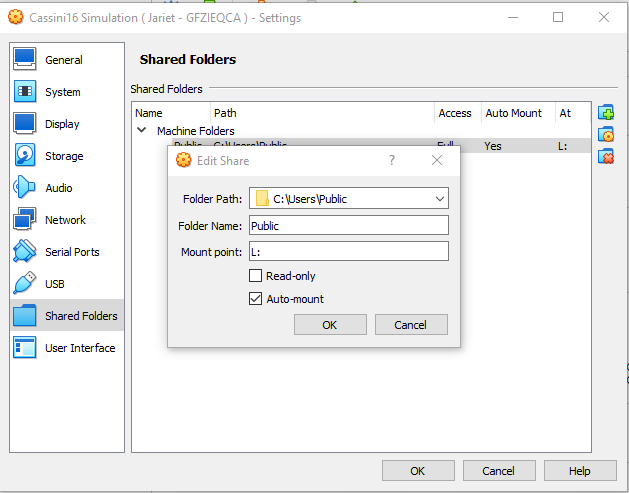
Click on OK and you are now ready to start the Cassini16 Simulation system, click on Start to boot the vm.
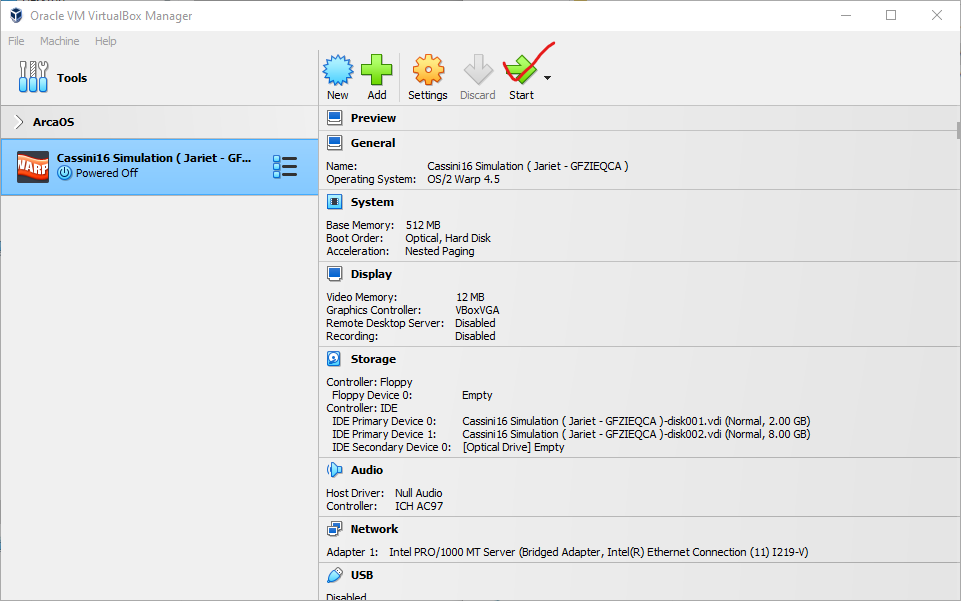
Wait until system completed its initialization, you should see a Guru program bar on the right.
The network driver is setup as DHCP client, to determinant the assign IP address, click on the Command Prompt (window) icon, to open an command window
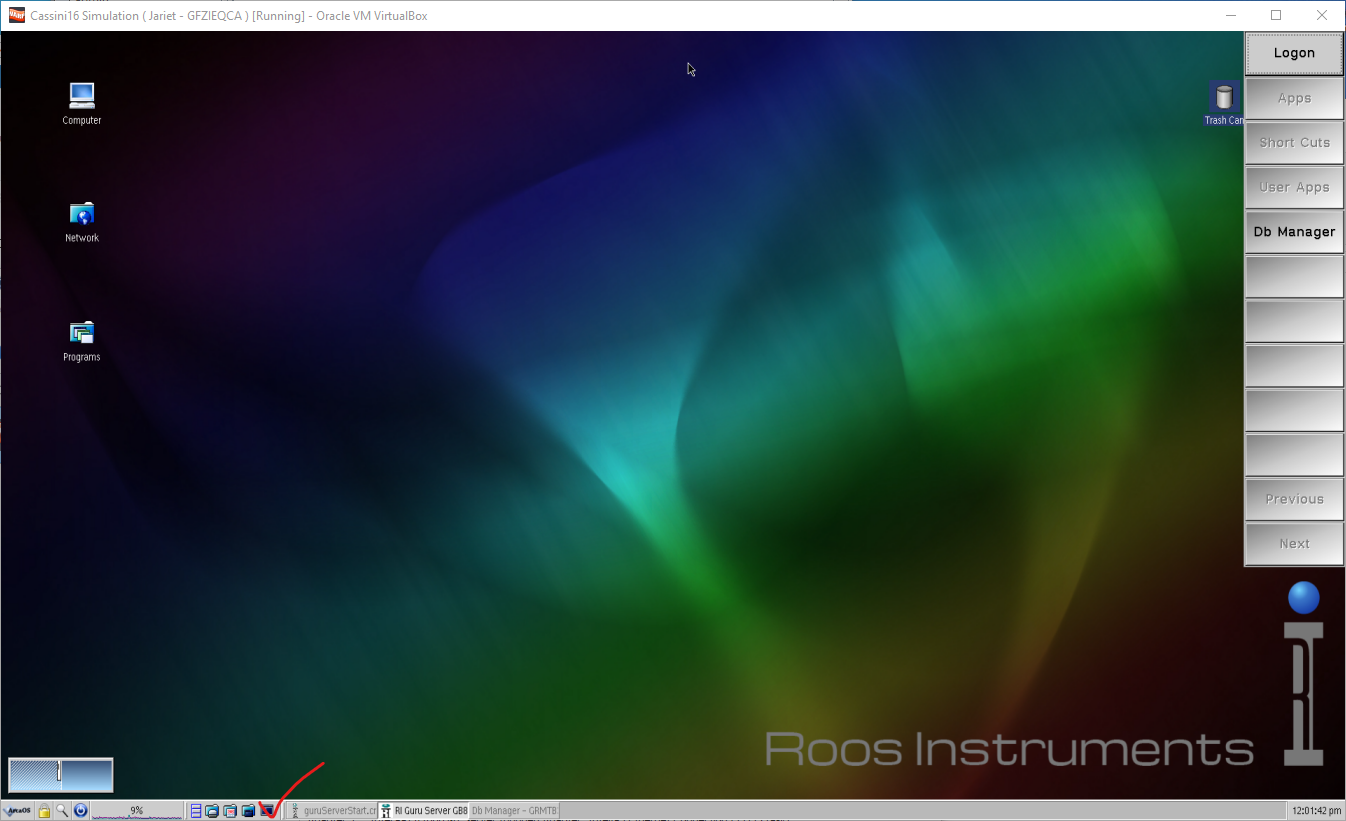
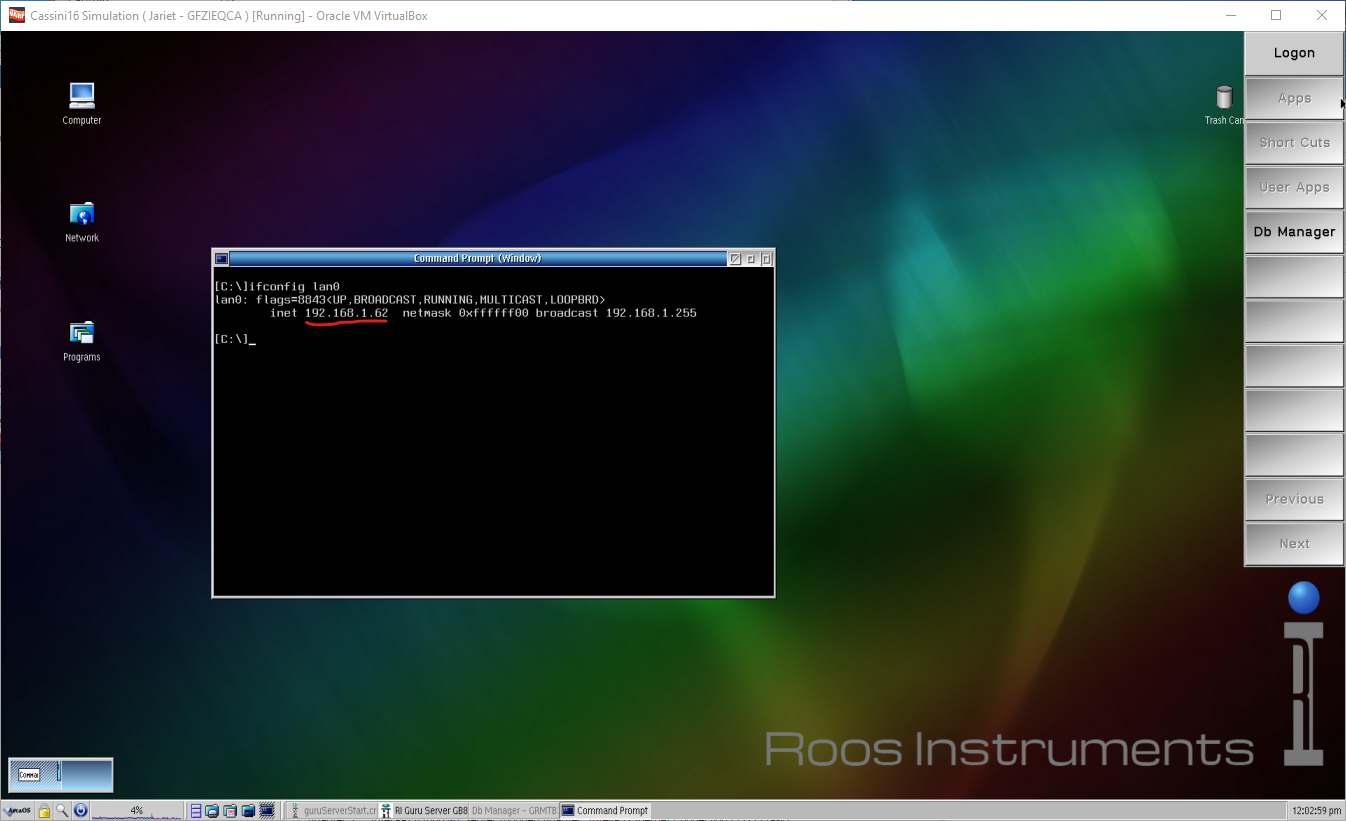
In the command window type in command
ifconfig lan0
this will show you the IP address that have been assign to this VM, i.e. 192.168.1.62
Next log in the Guru as usual, then click on the Short Cuts and select the "Jariet Dev 1.0"
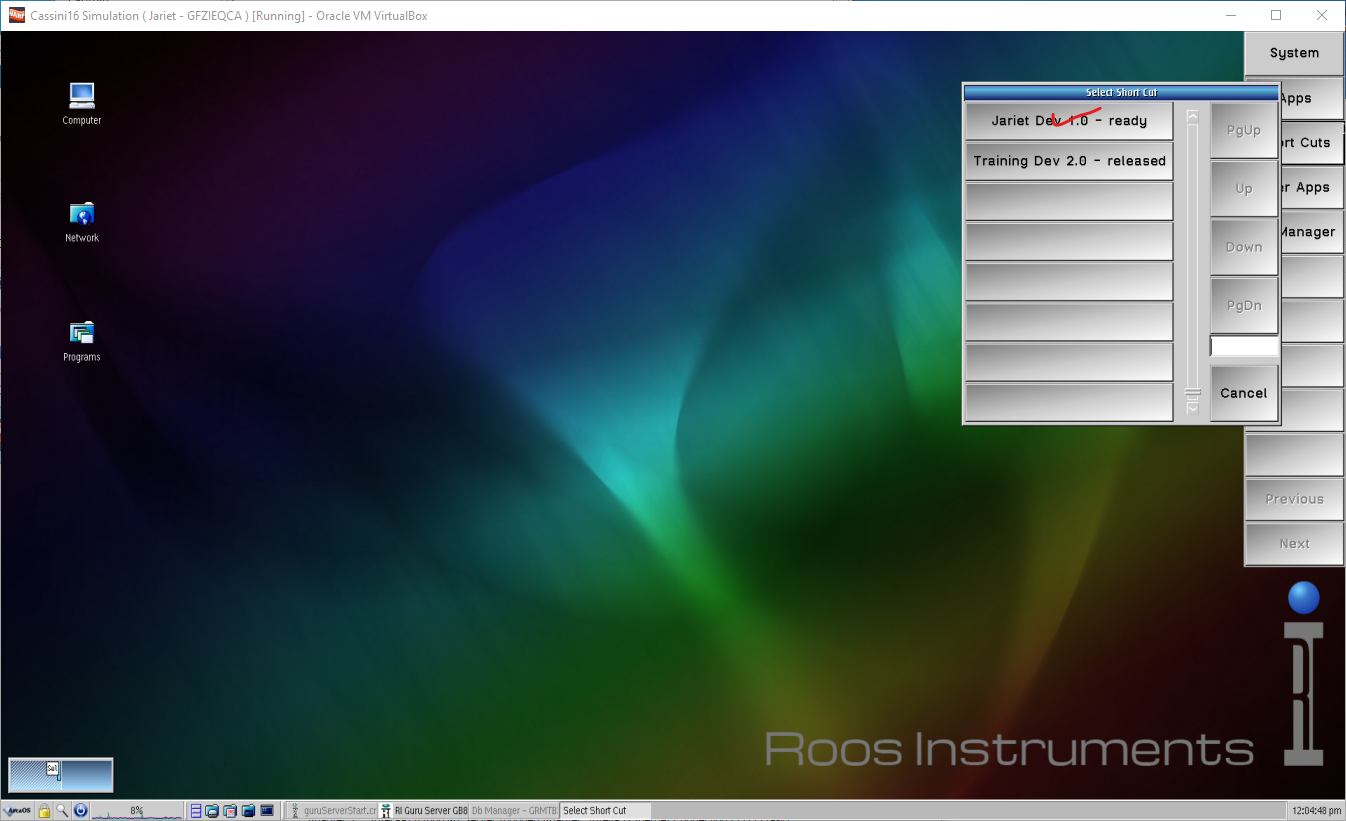
Wait for the Cassini system to finish loading, you should see a UTC time on the message window
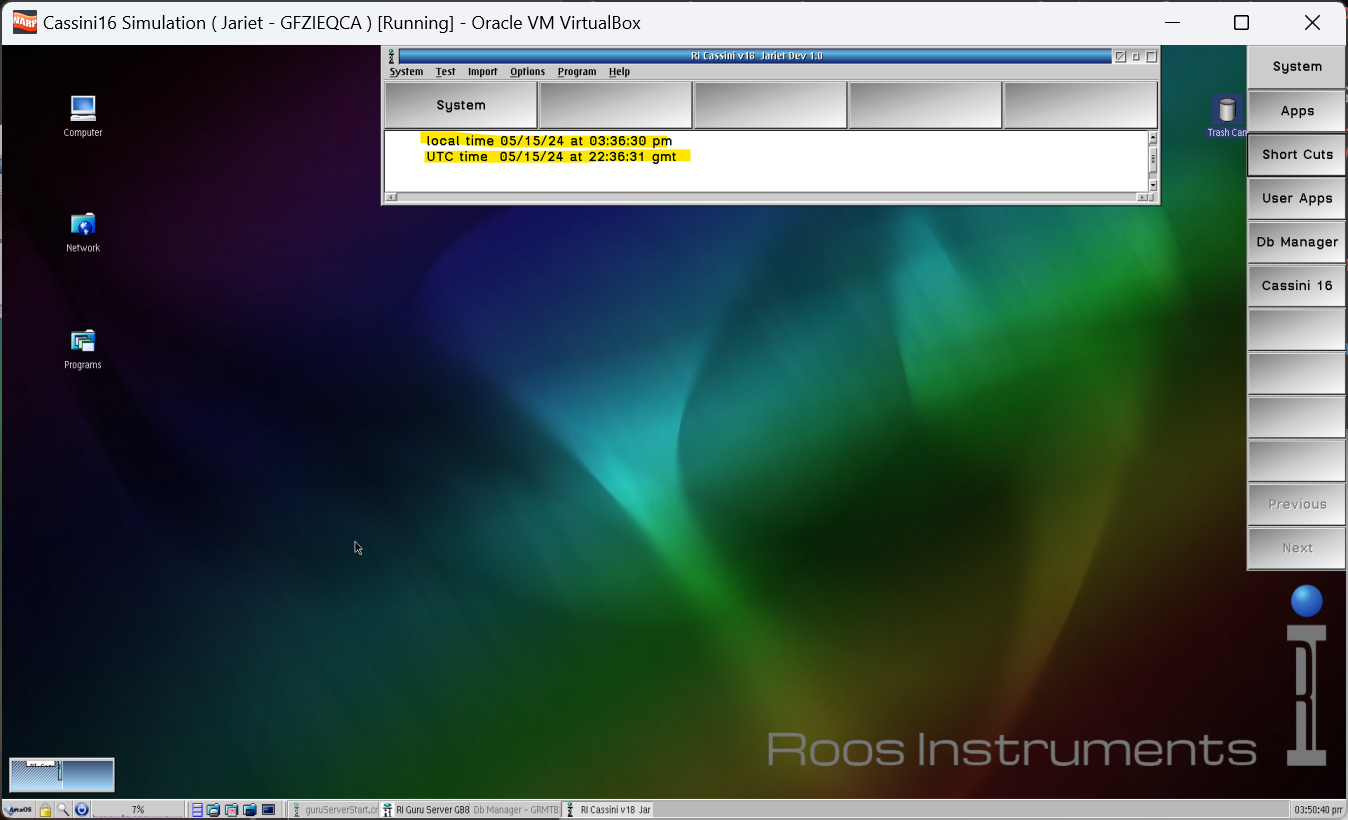
On the host system unzip the "RI Remote Control.zip" file and open a Terminal into that directory and type in the command
java Test <ip address>
replace the <ip address> with your IP, in this example, java Test 192.168.1.62
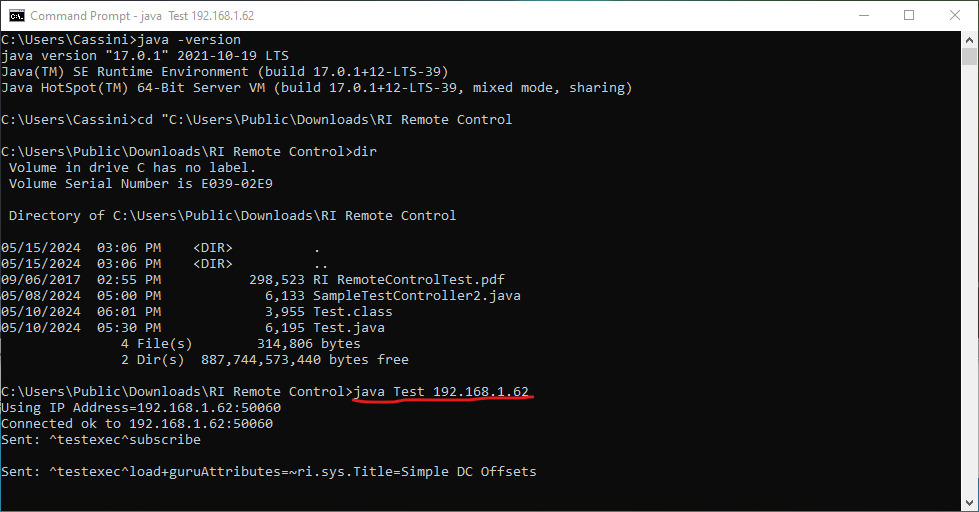
Here show the Cassini16 load a TestExec and compile it
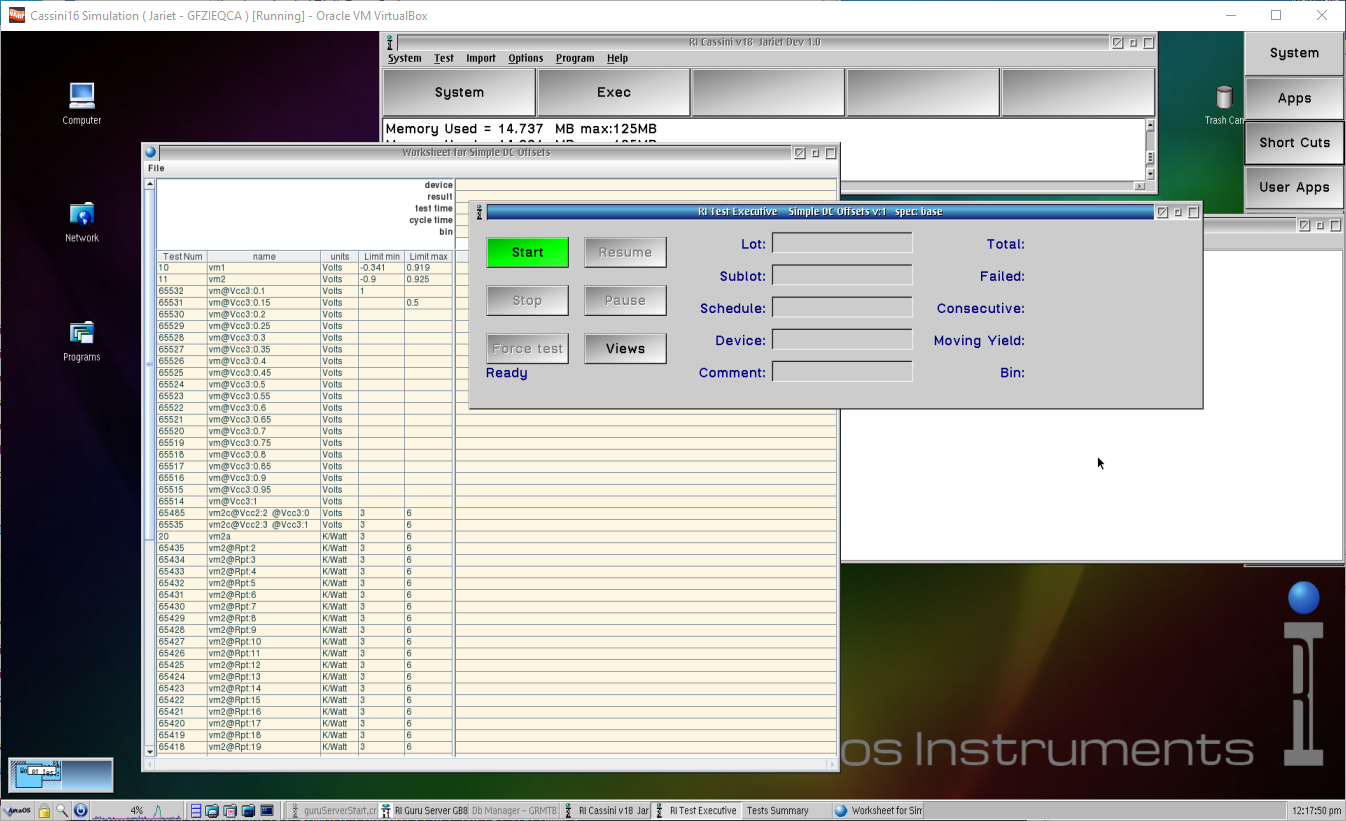
Here show it run some parts and data display on the worksheet
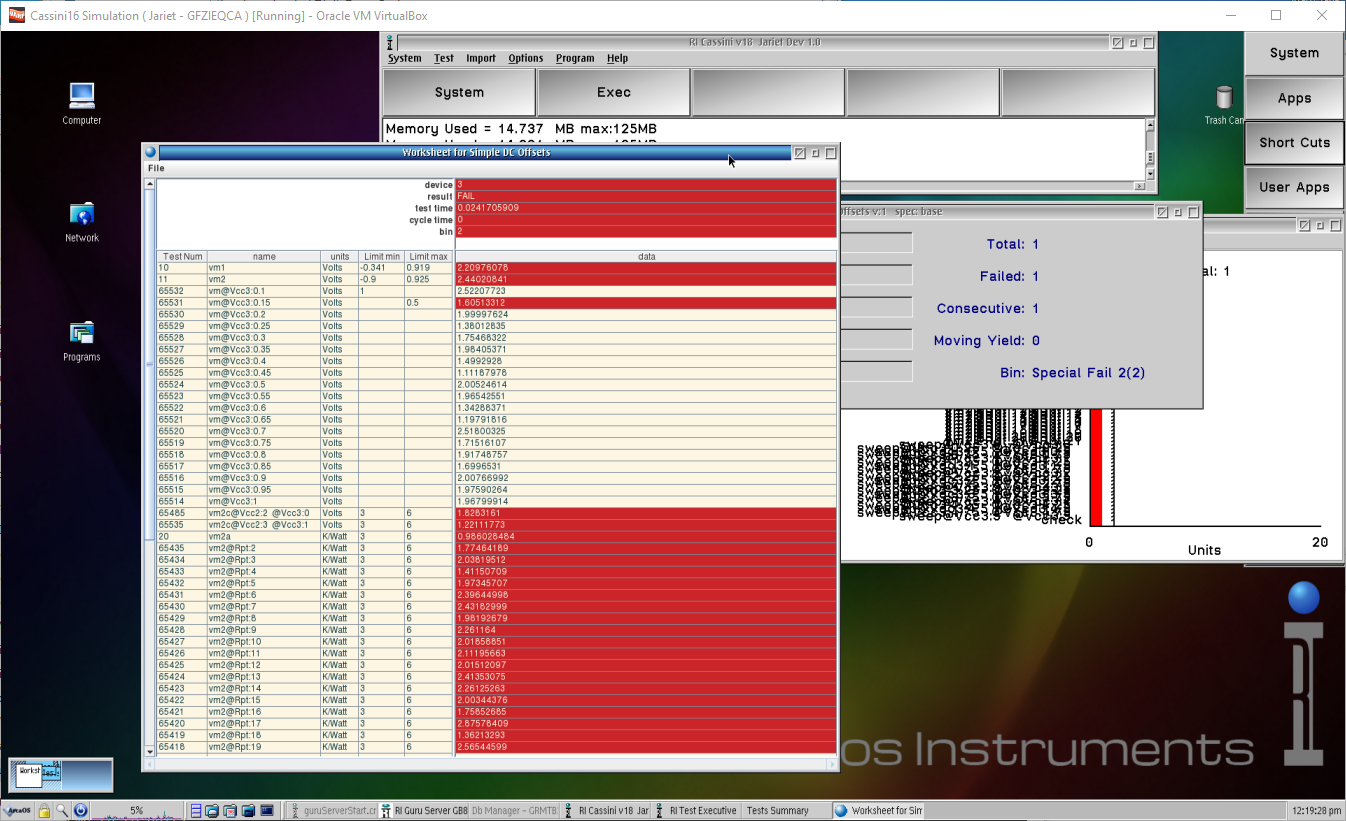
This is after lot ended and TestExec unloaded
