If planning a Cassini System Controller EPC exchange, it may be useful to backup the local guru and apps so the replacement EPC can be setup with all the correct settings and data. Without a Guru Server, an EPC exchange requires that the RiApps and RiGuru directories are transferred.
Perform the steps below before removing the original EPC. ONLY If the EPC won't boot, the drive would have to be exchanged in a functioning EPC and then these steps must be followed.
For RI8574 ArcaOS EPCs, do not move the drive to a new EPC hardware because it contains unique calibration data for the RIFL master and may cause the tester startup process to fail. Please contact [email protected] for specific instructions for migrating that information.
To Transfer EPC Guru and Applications Directories:
- Backup currently running EPC:
- For ArcaOS EPC, open a command window and enter the following commands to archive the RiGuru and RiApps directories creating a .zip file. (-r is required to recurse into directories, -s splits into 2G files, -9 is max compression). Always press [enter] key at the end of each command.
d:
zip -r -s 2000m -9 BackupYYYYMMDD RiGuru RiApps - For Linux NUC, open the File Manager (Thundar app) and select the RiGuru and RiApps and choose Create Archive... Enter "BackupYYYMMDD" and choose Create.
- For secure EPC (Win10), select the RiApps and RiGuru directories from the home path that are often linked to D:\Users\Public.
%HOMEPATH% or or C:\Users\<Username> and choose Send To > Compressed (zipped) folder from the right mouse button menu. - Attach a compatible USB drive or Network folder and copy the archive. If a shared network drive is mounted, change "e:" to be the drive letter of the intended destination.
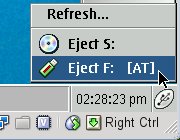
copy Backup*.zip e: - Once the file copy command completes, eject the USB drive with the USB Eject icon in the lower right corner following steps appropriate for your OS. (See Figure 1)
- Proceed to Shut Down the OS and swap EPCs. Startup the replacement EPC and attach the USB Drive.
- Restore to new EPC:
- For ArcaOS EPC, open a command window from the OS task bar and type:
d: [enter]
unzip -o e:\BackupYYYMMDD.zip - For Linux NUC, double click the
- For secure EPC (Win10), right click on the .ZIP file and choose Extract All, choose Browse, then type %HOMEPATH% in the top of the Select a destination prompt and press ENTER. The destination will change to "C:\Users\<Username>" and choose Select Folder. Then press Extract.
- Choose System > Shutdown to restart Guru
- Proceed with the other steps on the Exchange System Controller EPC TIM Checklist https://roos.com/docs/RBEH-APL2LM
Figure 1: Eject F: Drive with ArcaOS

This process requires a compatible USB drive or shared network drive. See these related app notes for details.
- Prepare USB Drive for Cassini EPC and Virtual Workstation (FAT + 2 GB max partition) https://roos.com/docs/RBEH-AXWT54
- Sharing Network Folders https://roos.com/docs/RBEH-7LD4MU

