

System Software
Graphical User Interfaces
Test Panels & Buttons
Copy & Paste Buttons to Create Test Plans
On Screen Help
The RI 7100A Microwave ATE System uses a graphical based, object oriented Expert Software System to create Test Plans, store and analyze test results and to interact with the test system’s instrumentation and networked peripherals. Test procedures are displayed graphically as Test Plan Panels. Measurements and measurement states are represented in the test plan as graphical objects which we call buttons. You create test plans by copying buttons from a library of panels and pasting the buttons into the test panels. The Expert Software System provides extensive contact sensitive On screen help for both the novice user and the experienced test engineer.
RI Test Executive
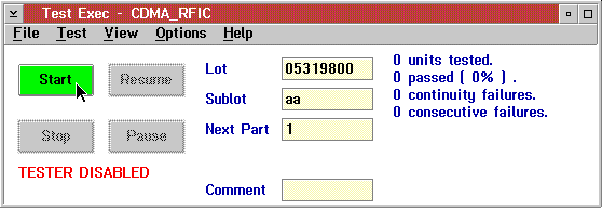
A typical Test Executive panel is shown above for a production test named CDMA_RFIC. This simple user interface controls a sophisticated set of measurement tools that are capable of completely testing a device with a package handler or a wafer prober. This executive can run multiple Test Plans and test against multiple limits while controlling temperature and binning in user definable soft bins as well as hardware bins. Lot code data may be entered by keyboard, touch screen or bar code and test data can be streamed in multiple formats such as STDF, Dlist, CSV etc. simultaneously. We will discuss this in detail later in the seminar.
Typical Test Plan
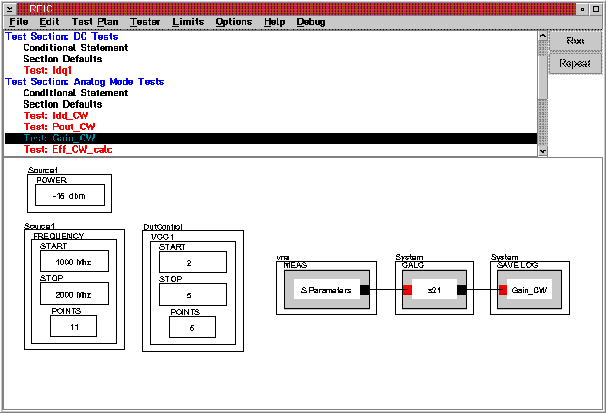
A typical test plan panel is shown above with a VNA Measure S-Parameter Button. Each Button is an object ( mini program ) that is capable of certain tasks defined in the inside of the double box as shown ( In this case a Meas task - short for Measurement ). This means that this Button or Object is capable of performing measurements and will pass on the data and it's data type to whatever measurement is defined in the inner box. The definition is selected from it's internal set of list which is determined by the ATE system. This is called the owner and it is defined in the outer top left corner of the double box button, in this instance the Owner is the VNA. The VNA is a virtual instrument and it has a specific set of measurements available, in this example we are using the fundamental measurement of S-Parameters.
The measurement state buttons on the left side of the test plan tell the system the conditions at which the measurements are to be made. In this example the measurements are to be made from Source1 Frequency setting from 1000 MHz to 2000 MHz in 11 steps, and DutControl voltage Vcc1 from 2 to 5 Vdc in 5 steps, and Source1 Power level at -15dBm (a total of 55 measurement states). The S-Parameter measurement button (shown in the middle of the test panel) tells the VNA to perform the S-Parameter measurements at each measurement state. The System, Calculation button calculated the data for just S21 and the Save Log Gain_CW button connected to the Calc button tells the system to save the test results in the Local SQL Data Base or data logger using Gain_CW as the column label and format it as a Log. This simple data flow structure also instructs the system to save into the database the complete measurement state/status, event time, the unique part number associated with each part, the operator’s name/ID number and the site location ID name/ ID number. Later we will see Data Flow Diagrams which also contain Calculation buttons and Local Variable Save buttons.
Test System Viewer Window
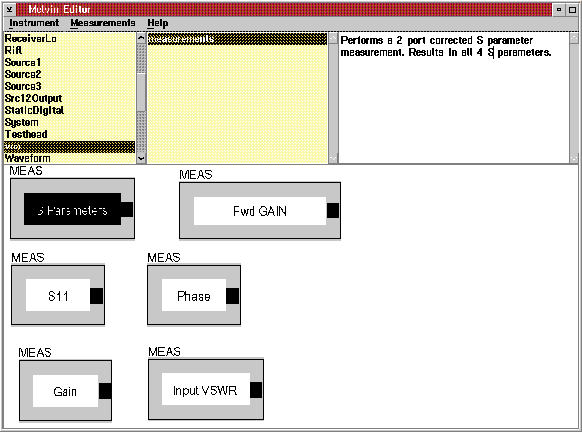
You create test plans, as previously shown, by copying buttons from the Test Instrument Panels into the paste buffer and then adding the buttons to a new test plan panel. For example to add the S-Parameter measurement button you select the VNA instrument and select the MEAS - S-Parameter button (highlight the button), and add the button to the test plan. The process takes just a few seconds. It is that simple and easy to create tests.
Measurement State Buttons
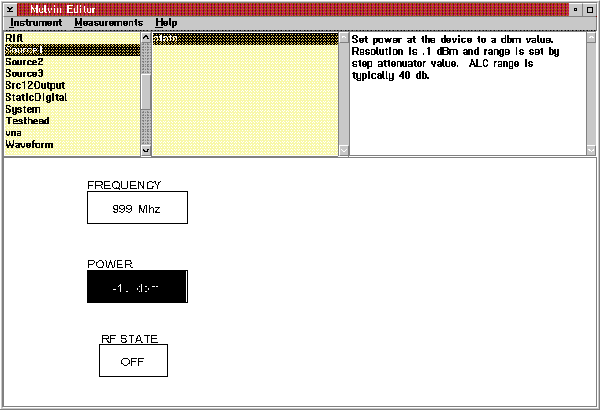
The Test System Viewer panels also provide the measurement state buttons. For example to select the source power state button in the previous example, you select the Source1 instrument and the state button types (shown above), select the POWER state button (highlight the button), and add the button to the test plan.
The test system software provides Test Instrument panels for each physical instrument in the system (such as the RI Test Head, RI System Receiver and the Microwave Sources) and each virtual instrument defined by the system (such as the noise figure meter, vector network analyzer, gain compression meter, etc.)
Test Plan Debug Tools
Run From the Development Editor
Breakpoint and Step Control
Interactive Control Panel
State Displays and Statistic Monitoring
Multidimensional Data Viewers
The test system software has powerful debug tools available that allow you to stop in mid stream, alter your controls, resume test and displays the test results using one of several different data viewers. The rectangular data viewer displays the test results for a test plan like the example measuring Gain of a 2 port LNA from 1 to 2 GHz in 11 frequency steps and at 5 different DC bias levels from 2 to 5 volts. Each bias level will typically be represented by a different colored trace to distinguish the results. The x axis is normally frequency, formatted with linear scaling. The Y axis is usually amplitude, but depends on the test data and can be formatted on the fly with the Y axis center line and the Y axis scaling per division user definable or autoscaled. The data viewers will be described in detail later.
Extensive On-screen help
Contact Sensitive Help for Each Object
Windows Style Help System for Search and Locate
Function Key Support for Pointer Location
User Notes Definable for Every Panel
Hierarchical Buttons with User Definable Notes
On-screen help is provided through out the system software. There are several ways to request help.
You can:
1) Select the Help menu bar choice,
2) Place the mouse pointer on the object, press and hold the Left mouse button and select the F1 key on the keyboard.
3) Place the mouse pointer on an object, click the Right mouse button and select the pop-up menu choice: Help.
Panel Notes and Hierarchical Buttons discussed in detail later in the seminar.